Part-2 : Setup/Configuring the Jdeveloper for Oracle Application Framework(OAF) Development.
1. If we want to do some OAF Development in Jdeveloper
for the first time, you will need to do download the correct
patch of Jdeveloper for Oracle E-Business Suite.
2. Extract the downloaded JDeveloper patch in a custom directory C:\ or D:\ or E:\ etc.


4. It will create a folder by name OAF1226 under F drive. This folder consists
three sub folders jdevbin,
jdevdoc and jdevhome.
Ø
jdevbin – Includes an extended version of the
Oracle JDeveloper 10g executable and OA Framework class
libraries.
Ø
jdevdoc – Contains documentation.
Ø
jdevhome – Includes the OA Framework Toolbox
Tutorial source and developer working area.

Steps :
- Right click on my PC or My computer.
- Select Properties and click on Advanced System Settings
- Select Advanced Tab and Click on Environment Variables

- Click on New and add Variable name as JDEV_USER_HOME and Variable value as F:\OAF1226\jdevhome\jdev and click on OK.

6. Now open the Jdeveloper IDE. Go to F:\OAF1226\jdevbin\jdev\bin
7. I opened on Windows OS and the Jdeveloper IDE looks like below- For Windows OS --> Double click on jdevW.exe.
- For LINUX OS --> Double click on jdev.exe.

8. Now close the Tip of the day box and Right click on Applications and create new OA Workspace.

9. Change File Name as your wish and Directory Name should be <Environment Variable Path>/myprojetcs (i.e., F:\OAF1226\jdevhome\jdev\myprojects) and Check Add a New OA Project option.

10. Click Ok and Click Next.
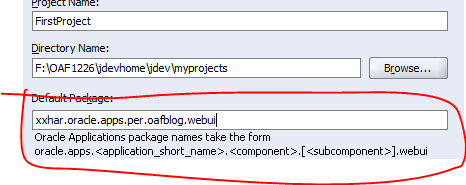
11. Change Project Name as your wish and Directory Name should be <Environment Variable Path>/myprojetcs (i.e., F:\OAF1226\jdevhome\jdev\myprojects). For Default Package please find below points.
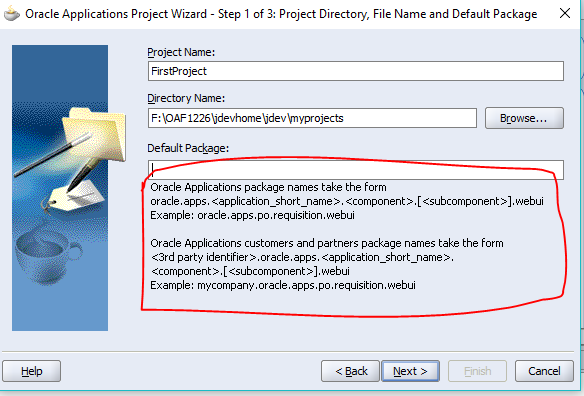
Note : Default Package has some format like marked in above image. My Default Package is
xxhar.oracle.apps.per.oafblog.webui (You will understand why we need to follow these formats in next blogs)
12. Click Next and again Next.
13. Get the .dbc file from server and place it in F:\OAF1226\jdevhome\jdev\dbc_files\secure.
(Please ask DBA to provide .dbc file for specific DEV/TEST instance or if you know the dbc file path from server you can copy).
Select DBC File name : F:\OAF1226\jdevhome\jdev\dbc_files\secure\<FileName>.dbc
User Name : (EBS Front end username)
Password : (EBS Front end password)

Now get all the assigned responsibility keys for user name which is configured in step-13. Below is the query to get responsibility key and application short name.

14. Select any responsibility key and related application short name.
Application Short Name : FND
Responsibility Key : APPLICATION_DEVELOPER

15. Click Next and Click Finish.
16. Now check the Application Navigator tab and verify oracle and mycompany folders got created(If not OAF environment is not configured properly) and Click on Connections to configure the Database.

17. Right Click on database and Click on New Database Connection.

18. Click on Next and enter connection name as your wish. Normally Database SID name.

19. Click on Next and enter database username and password.

20. Enter Host name as server host name (you can find in dbc file),
Enter JDBC port as DB Port (you can find in dbc file),
Enter SID as DB SID(you can find in dbc file).


22. Navigate to Application Navigator and Right click on any standard/test page and Run to verify the setup or configuration. If any errors, Please add in comments section.

23. Final Test page and Configuration is completed and Environment is ready to work on OAF pages.

In the next article, we’ll be learning Hello World Page.

Comments
Post a Comment